Followers

Wednesday, October 31, 2018

Spooktacular Ghosts and Pumpkins

Happy Halloween everyone,

today I'm going to show you a quick tutorial using my Amazing Mold Putty and some Scentsy! This is super easy to make and can be used for any holiday you wish!

I started out by cutting some ghosts and pumpkins with my Silhouette out of chipboard.  I cut 5 pieces of each and hot glued them ontop of each other to give them some height.


I added some washi tape around my ghost to give him some dimension.  My pumpkin kinda looks like an apple :(


Then I mixed up my Amazing Mold Putty, and you can go HERE to watch
a video on how to create your own molds using the mold putty.


Molding only takes a couple of minutes and with your imagination, 
you can create any shape you want.

Once the mold has set up, I began by melting some Scentsy wax in a glass 
dish in the microwave at 1 minute intervals and poured it into my mold.


I used Clarity for my ghosts and honey dew for my pumpkins.  
I didn't have an orange colored Scentsy flavor, but you get the idea!


Then I packaged them up and made them look cute.  
Wouldn't these make cute teacher or coworker gifts?


Please leave a comment and let me know what you think of my cute halloween gift.

As always, have a great day and God Bless.


Tuesday, September 18, 2018

Good day all and thanks for coming to see me today.  I've certainly missed blogging and hope to get back at it on more regular basis.  Allot has happened and I will catch you all up with some posts in the coming months.

So I've come to realize I've got more crafting supplies than any one person should have.  I do wood projects, vinyl projects, htvinyl projects, resin projects, jewelry projects and on and on and on.  Yesterday I decided to take this week and do some serious purging.  I filled up an entire large recycling bin and our garbage also.  Today I filled one tote with garbage and two with recycling.  These will be put out when our bins are empty.  Gotta leave some room for the every day stuff.

While I was purging I found so many things I had forgotten about.  It was kinda like Christmas.  I decided I'd let myself do a little bit of crafting and this is what I did.

So a long, long, long time ago I went to the South Dakota State Fair with one of my very best friends to see Charlie Pride.  It was a great concert.  As we were walking around before the concert I watched this young lady do spray paint art.  I was in awe with her talent.  A couple cans of spray paint, some swiping of the hand and some cardboard and she created beautiful masterpieces.  We headed to the concert and I couldn't get this one picture out of my mind.  I'm very much a patriotic person and she had done an amazing job on the twin towers.  (This was many years before 9/11).  After the concert I went back and it was still there just calling my name.  She had painted it on some standard tagboard and while it was sturdy I knew I would get it framed.  When my husband saw it he said we should should put it in a light up frame and let the colors shine through the front.  Well it sat for many, many years til this morning.


I started with an old canvas frame that I took the old canvas picture off.


I measured the frame against some foam core and hot glued them together.  Then I took my LED lights and cut a hole in the foam core for the battery pack to nestle in and taped the strings of lights onto the foam core.


Here you can see the battery pack is accessible to turn on and off


I did add some silver washi tape around the edge to keep it in place.  This picture above is without the lights on 


This one the lights are on but it's kinda hard to see the true beauty.


This is what it looks like in the dark.  
So beautiful! 
#911neverforget #unitedwestand

So I hope you've found my tutorial somewhat helpful and I hope to show you some more in the coming months.  Thanks for coming and have a beautiful day!


Thursday, October 19, 2017

Designer Connection bloghop

Good day all,

Today we are hopping along with the artists of the Designer Crafts Connection who has taken on the challenge of creating Amazing Casting Products.

So head on over to our main page HERE and start the blog hop

This is a sneak peek of what I came up with for our bloghop


Thanks for hopping along with us and make sure to visit all the stops along the way.

Until next time...happy crafting!


Saturday, June 17, 2017

Christmas in July smoothfoam wreath

Good morning

Today I wanted to show you a quick wreath I made last night getting ready for Christmas in July!

About a year ago I won a contest sponsored by Smoothfoam crafts! I received six different smooth foam wreaths in various sizes! What I absolutely love about the smoothfoam wreaths is that they are sectioned so you can see exactly where you want to place your ribbon or any other embellishments and no measuring is needed!


In searching through my stash I also found some white foam stars.

I  started with my wreathform and cut some denim strips about an inch wide and the length of the pant leg! Then tied those denim strips on to three sections of the of the wreath form.


I also wrapped the rest of the form with red and white Christmas ribbon and added some bows and hot glued them on with those white stars to give it more dimension.


I did the same thing to the denim section.

By adding some of the strip of denim from the seam I created the hanger and here it is in all it's glory!


I hope you like my quick tutorial using the smooth foam wreath form.
 Thanks for coming and I hope to see you again soon - Brenda


Wednesday, June 14, 2017

#100daysofmolds

Good afternoon,

I'm not sure if you're aware but we are doing #100daysofmolds over on Instagram!  Head over to Instagram and check out what were talking about. Here's just a few examples of what I've been doing.


These are just raw resin pieces, but soon I will have finished products to show you with tutorials!

Make sure to also stop by the Amazing Mold Putty blog and check out what all the designers are creating over there!

Thanks for coming and I hope to see you soon!

Tuesday, June 13, 2017

Candle ambiance

Good afternoon crafty people,

Today I want to show you a quick tutorial of how I created a candle from a upcycled jar!

If you remember about a month-and-a-half I was a participant in a blog hop for stencil girl.  I created an awesome elephant Mosaic in blacks and purples! (You can see the full tutorial here 


After it had been sitting on my end table for a while I thought it might need some ambiance with it so I created this!


I started with a plain jar that hubby threw the lid away for (always upcycling) and mod podge and food coloring! Just pour some mod podge and a few drops of food coloring into the jar and swirl it around! Turn it upside down on some newspaper and after it dries put it in the oven for about 30 minutes at 225 degrees!


Now I really do like the look of the clear glass but I was going for another look.

After pulling it out of the oven I let it sit for a while and then I took a spray bottle filled with water and my looking glass spray paint and spritzed the jar with the water and then spritzed some of the glass paint. I also just ran my fingernails across the jar while it was still somewhat wet to give it some openings. And this is what you get!


After it completely dried I plopped a candle inside the jar and set it next to my mosaic for a nice glow!


Pretty awesome, right?  I hope you've enjoyed my quick tutorial and please leave me a comment and let me know what you think!

Thanks for stopping by and be sure to keep following my blog for future tutorials!

Have a great day - Brenda

Sunday, June 11, 2017

HTV versatility

Good day friends,

I just wanted to share a few of my recent projects using HTV. I'm so in love with heat transfer vinyl. The possibility are absolutely endless!


A baseball cap 


A oven mitt filled with goodies


A birth announcement


Baseball shirts for moms


Canvas shoes


A statement shirt

I can't wait to work on more things to show you!

Thursday, April 20, 2017

Elephant Mosaic

Welcome to our Stencil Girl's Bloghop.  I'm super excited to share a fun project with you today, but first a little backstory about myself before we get into the tutorial.  My name is Brenda and I've been with Amazing Casting Products since the beginning and I've enjoyed every minute of it.  My blog is Creativity is a State of Mind because I believe each one of us has a different view on artistic talent.  I've definitely come a long way since working with this Amazing team.  Also working with these products has taught me so much and I've enjoyed learning new techniques.  Therefore, whenever we can partner up with another designer or design team, I look forward to expanding my horizons.  

Since I've been on the design team for so long, I've accumulated ALOT of pieces.


Anytime I'm making a project I wind up with more and more resin pieces.  Some finished, some not.  And this is how my project was born ...

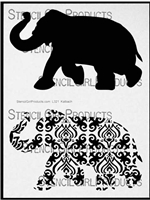
I started out with a foam core piece that I cut to 10 x 10 and I painted green with acrylic paint.  Next I took my Stencil Girl Elephant Parade (which by the way is my obsession)

 Elephant Parade Stencil by Nathalie Kalbach

and traced the elephant with a pencil after the paint was dry.


It doesn't have to be perfect because I'm only using it as a guide.

Next I got out my box of resin pieces and began laying them inside the elephant outline.  It was kinda like putting a puzzle together.  Absolutely every one of these pieces has a story for me.


Here are a few pictures of some of the pieces I used with their molds.  (I've made ALOT of molds :)  The Amazing Mold Putty is still by far my favorite product.  I love duplicating little charms and such that I find while antiquing or junking because I don't want to use the original piece.  Especially in a project like this one.

Some butterfly charms

A Fleur De Lis I found in a box I bought at an antique shop.

The Fleur de Lis that I embedded into an 
Amazing Clear Cast Resin bezel.

Some leaves that were molded from a broach that I got
in a jewelry lot at an auction.

Branches that were hair barrettes to start out.

I just have tons and tons of molds...

After I had all my pieces laid out the way I like it, I glued them down.  After they were all securely adhered I took the piece outside and spray painted it black.


I didn't let it dry completely though.  
In fact, I took a hairdryer and gave it a 3 minute blast on the cool setting.

Stencil Girl's Ornamental Compass Screen was my next addition to this piece.  

Ornamental Compass Screen Stencil by Gwen Lafleur

I dry-brushed it with purple metallic acrylic paint around the edges of the corners.


While that was drying I also used the same acrylic paint and dry-brushed the 
elephant mosaic-ed pieces to give them some dimension also.

In my box of pieces I also found some roses I made a long time ago with the Amazing Clear Cast Resin.  I absolutely love how they looked like glass, but I did  want to give them a bit of dimension also.  I dry-brushed a bit of black and the purple metallic around the edges.  Just enough so that you can still see their clearness, but also some definition.  


After everything dried a little, I  saturated the entire piece with the Amazing Clear Cast Resin.  Not only does this give it a nice GLASS touch when it's cured, but it will also keep everything  in place.  But now here comes the magic.

I took a toothpick and ran it around the edges of the elephant outline while the clear cast resin was still wet and also within the stenciled area to "scrape off" some of the black and purple to expose some of the green base.  It gave is just enough color to make it pop.


After letting it cure for 24 hours I was able to display it in my elephant collection.  Now, the best part of this is it's weight.  If you would have used this many heavy trinkets, your piece would have been very heavy.  The Amazing Casting Resin is so super lightweight. 
This by far is one of my favorite projects up til now.


I totally love how this turned out and I hope you have found my tutorial useful.

Now for the bonus fun stuff.  There is a giveaway involved...


One lucky winner will receive both a $25 Gift Certificate to StencilGirl Products

AND a $25 Gift Certificate to Amazing Casting Products!
Visit the fabulous designers from both teams and comment for your
chance to win!
The more blogs you comment on, the more chances you have to WIN!
(One comment per blog please.)
You have until Sunday, April 23rd at 11:59PM Central Time to leave your comments.
Winner will be announced on
StencilGirl's Facebook page and Amazing Casting Products’s Facebook page
on Monday, April 24th.

So thank you for coming and hopping along with us today and be sure to leave a comment so you get entered in the giveaway.  Until next time, happy crafting.